


Step 1: Define Goals
To get the most out of Chatlayer, success starts with managing expectations. Creating robust flows and training a sophisticated NLP model is a journey, not a sprint. While the AI becomes smarter at recognizing patterns over time, it relies on you to breathe life into it and define its responses. By setting realistic goals, you empower your team to plan for the long term. If you are looking to accelerate this process, consider whether to handle the heavy lifting yourself or bring in a dedicated team—like Covington—to help you build a world-class solution.
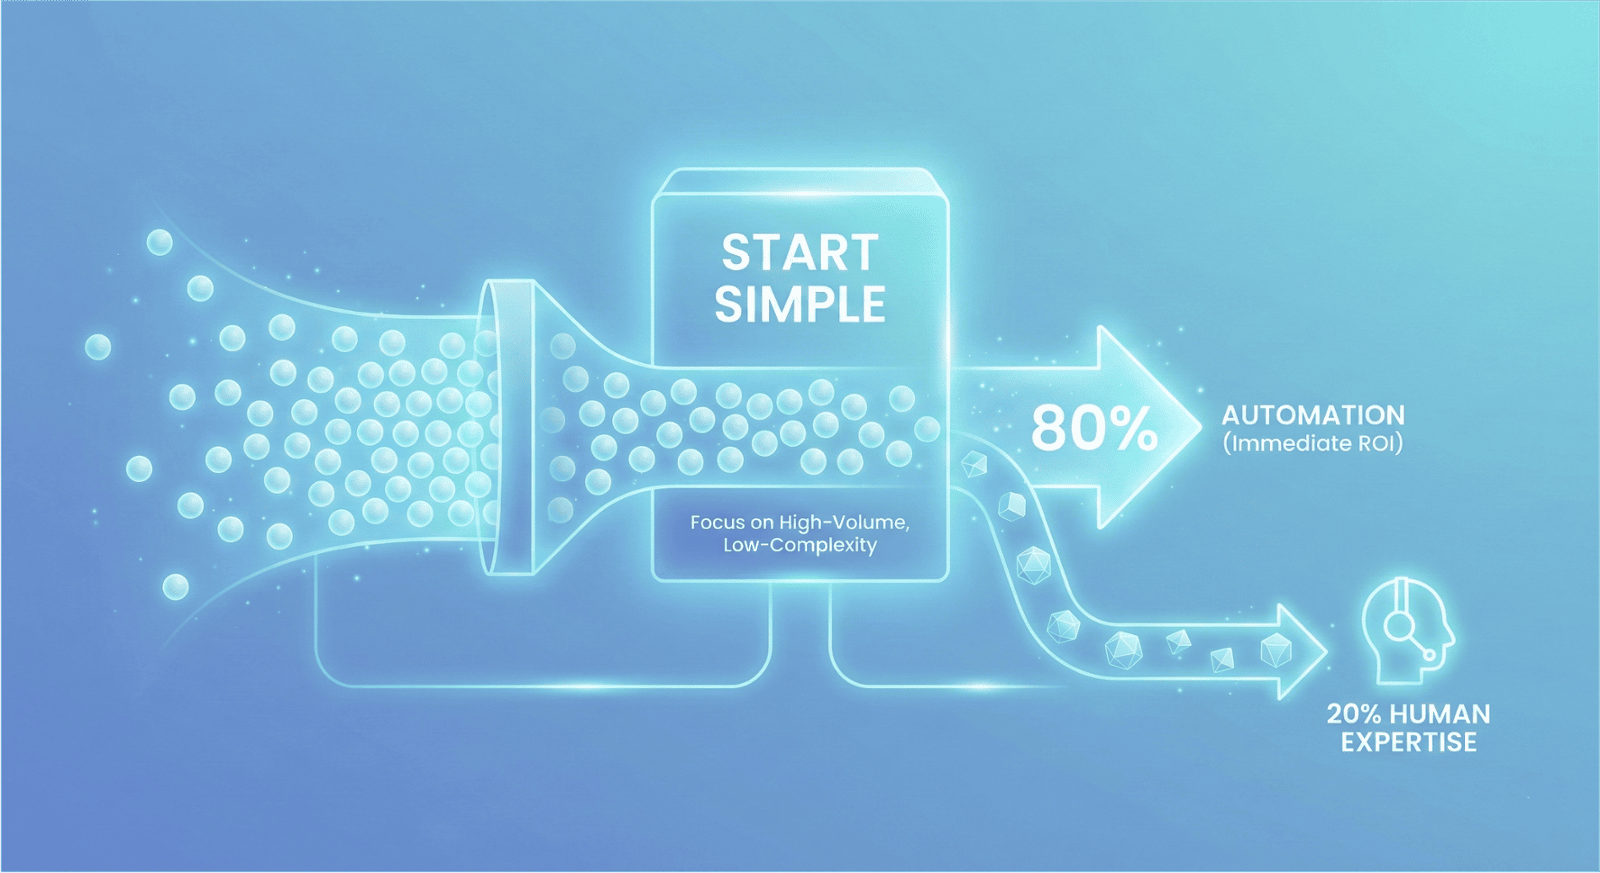
Step 2: Start Simple
With expectations aligned, adopt a focused implementation strategy. We recommend prioritizing the high-volume inquiries that drive the majority of your traffic; a bot that automates only a handful of topics but resolves 80% of user requests delivers immediate ROI. This efficiency allows your human team to dedicate their expertise to the remaining 20% of complex cases. From this foundation, expand the bot’s capabilities iteratively using data from real user interactions. A precise, high-performing deployment is far superior to a broad scope that fails to deliver quality.
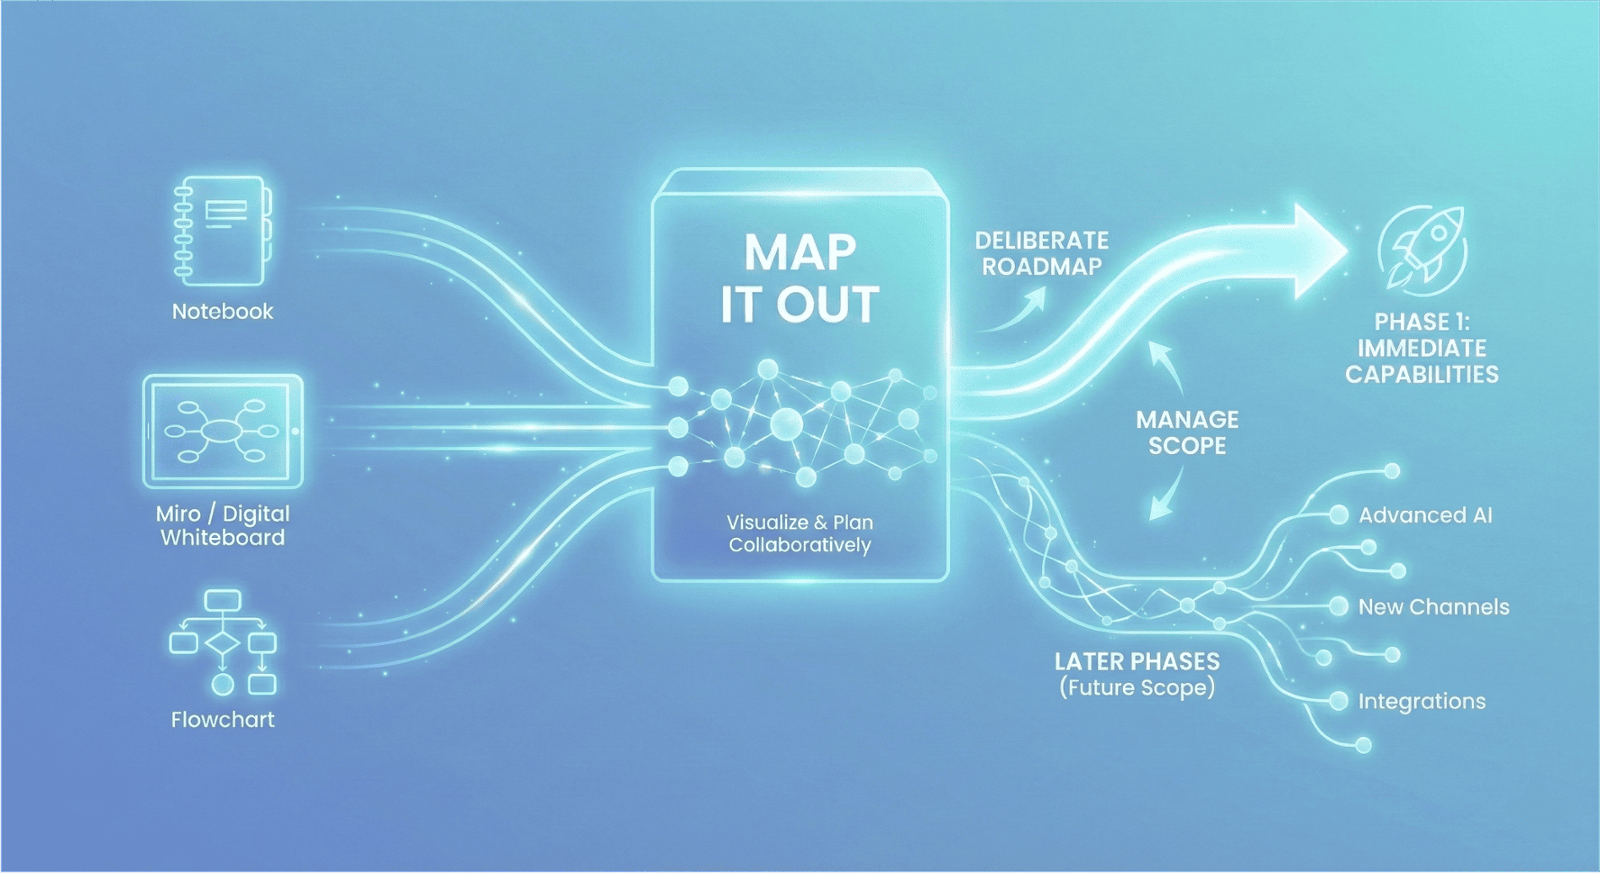
Step 3: Map it Out
Success lies in the planning.
Don’t keep your strategy in your head—map it out. Whether you use a flowchart, Miro, or a simple notebook, take the time to visualize your bot flows and logic collaboratively with your team.
Be deliberate about your roadmap. Distinguish between the capabilities you need immediately and those that can be deployed in later phases. Staying organized from the start is the only way to manage a scope that will inevitably grow.
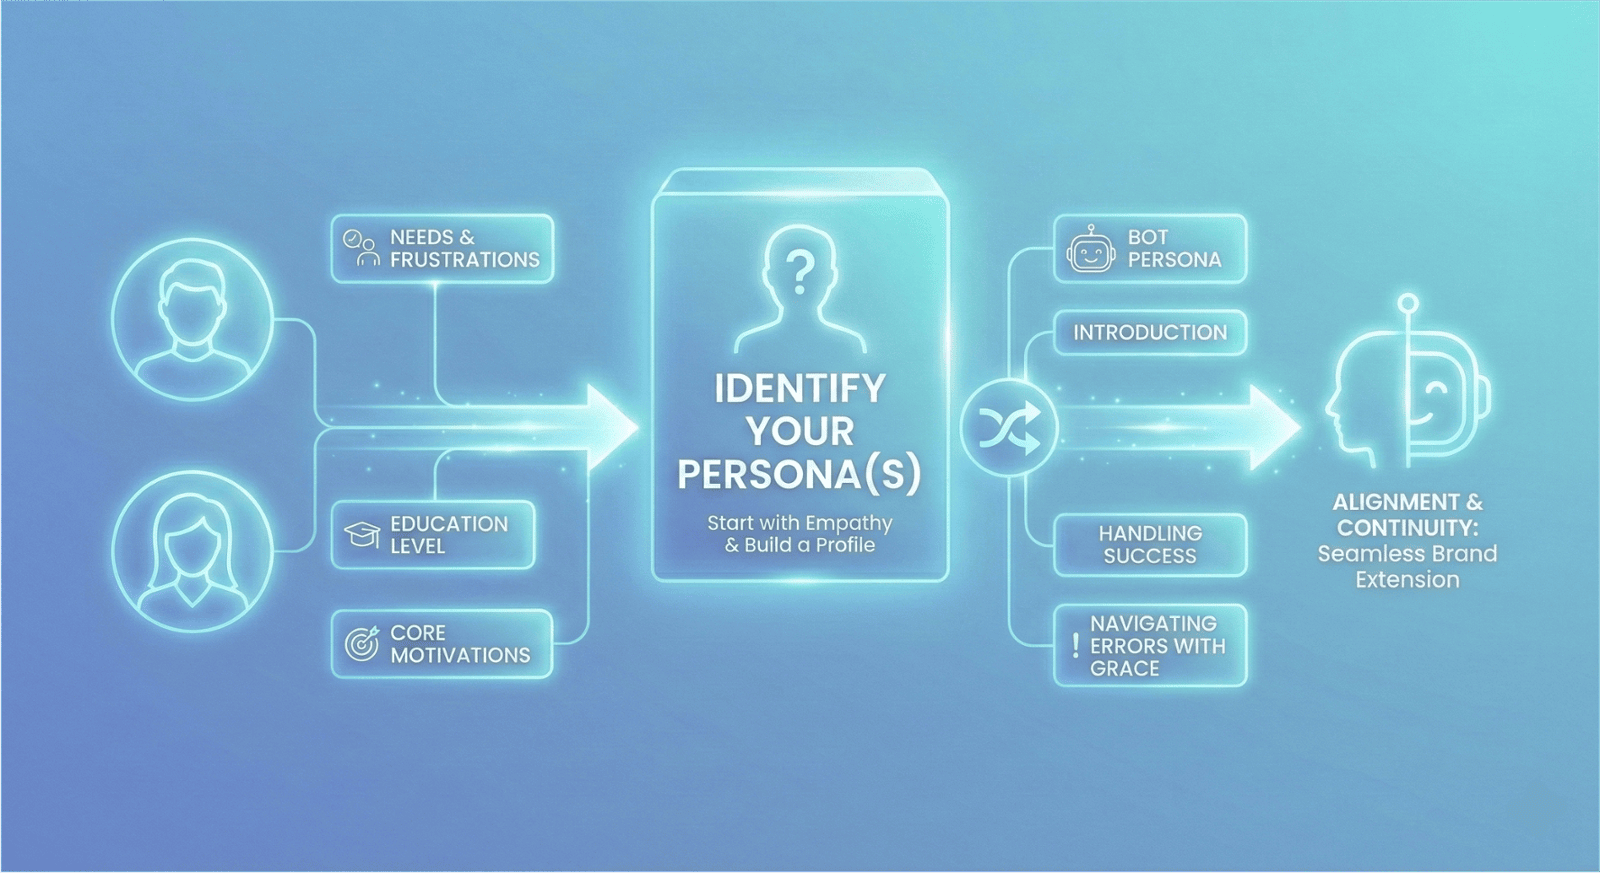
Step 4: Identify your Persona(s)
Effective automation starts with empathy.
Before writing a single line of dialogue, construct a detailed profile of your ideal user. Go beyond basic demographics (age, location) to understand their core needs, frustrations, and education level. Once you understand who you are talking to, define who is doing the talking. Synthesize your user data with your business goals to create a robust "Bot Persona." Define how it introduces itself, how it handles success, and—crucially—how it navigates errors with grace.
This alignment ensures continuity. Your bot shouldn't feel like a robot; it should feel like a seamless extension of the brand you have already built.
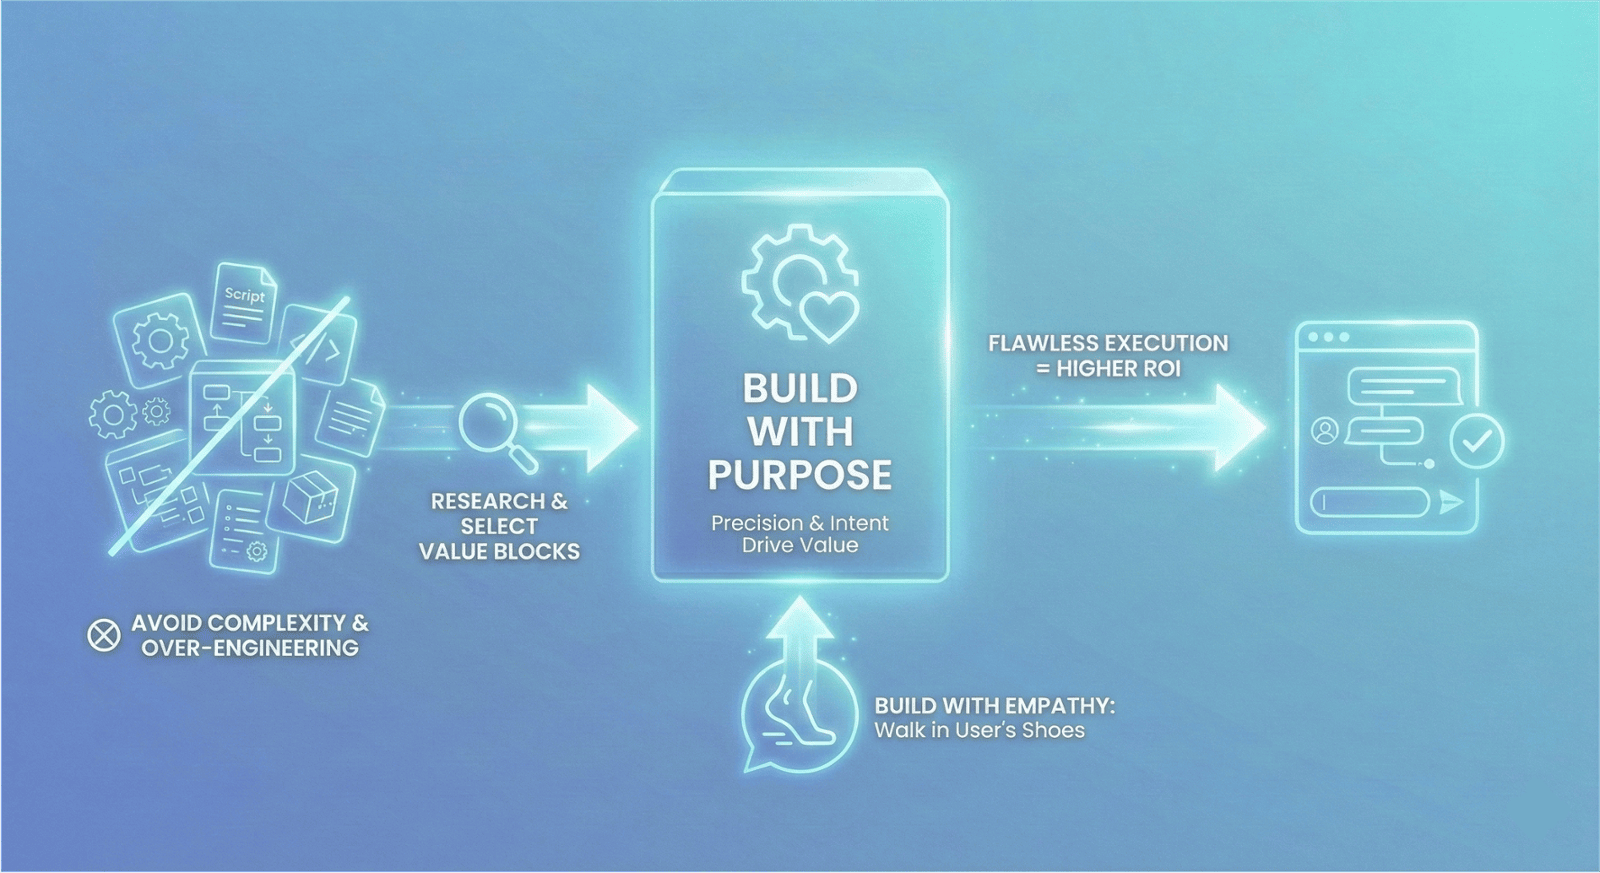
Step 5: Build with Purpose
Don’t let complexity kill your user experience.
Moving from planning to building is an exciting shift, but it requires precision. Instead of rushing to implement every feature available in Chatlayer, take a step back. Research the specific function of every building block and place them where they drive the most value.
Build with empathy. Walk through your own flows in your user’s shoes to ensuring the dialogue remains conversational and life-like.
Finally, resist the urge to over-engineer. A compact, flawlessly executed chatbot delivers significantly higher ROI than a sprawling, disjointed system. Stay within your scope and build with intent.
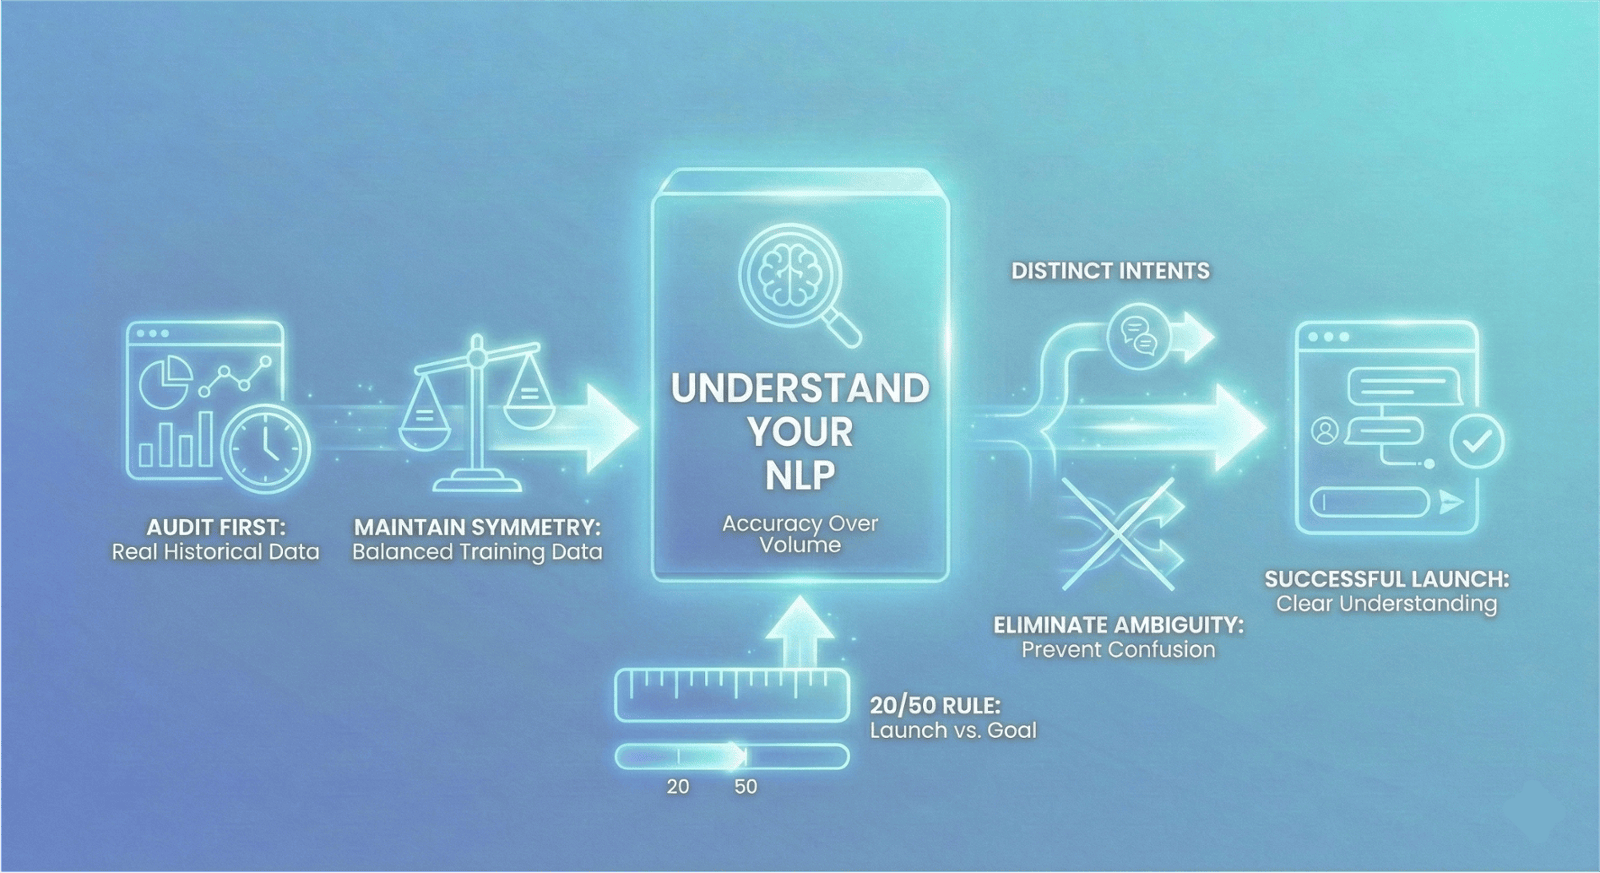
Step 6: Understand your NLP
Building the flow is easy. Teaching the bot to understand is the challenge.
To set up your Natural Language Processing (NLP) model the right way, accuracy must be prioritized over volume. Follow this protocol for a successful launch:
1. Audit First: Base your intents on real historical data, not assumptions. What are your hashtagcustomers actually asking?
2. Maintain Symmetry: Keep your training data balanced. If one intent has 100 expressions and another has 5, the hashtagAI model will be biased.
3. The 20/50 Rule: Launch with a minimum of 20 expressions per intent, but aim for 50 distinct variations before going live.
4. Eliminate Ambiguity: Distinct intents require distinct phrasing. varying your training data prevents the bot from becoming "confused" by overlapping concepts.
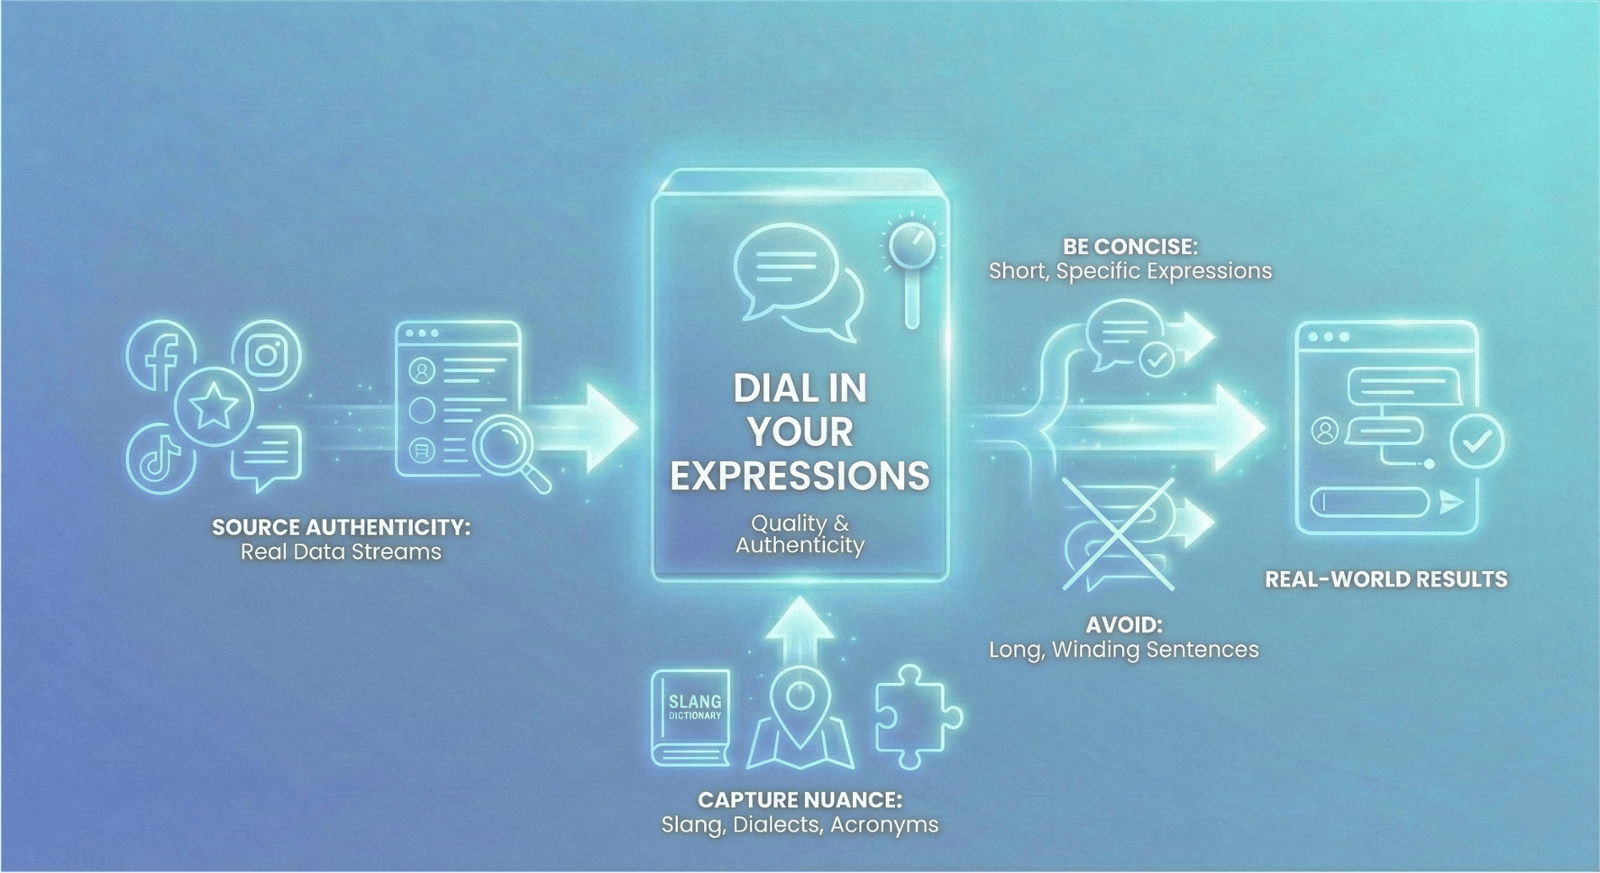
Step 7: Dial in your Expressions
Training a bot? Ditch the dictionary and look at the data.
The vitality of your chatbot relies on the quality of the expressions you feed it. To move beyond basic keyword matching and into true understanding, follow these principles:
1. Source Authenticity: Utilize real data streams—social media, reviews, and chat logs—to capture authentic language patterns.
2. Be Concise: Shorter, specific expressions always yields higher training quality than long, winding sentences.
3. Capture Nuance: Users don't always use proper grammar. Your training set must include slang, local dialects, and acronyms to accurately identify intent.
When you train with real-world imperfections, you achieve real-world results.
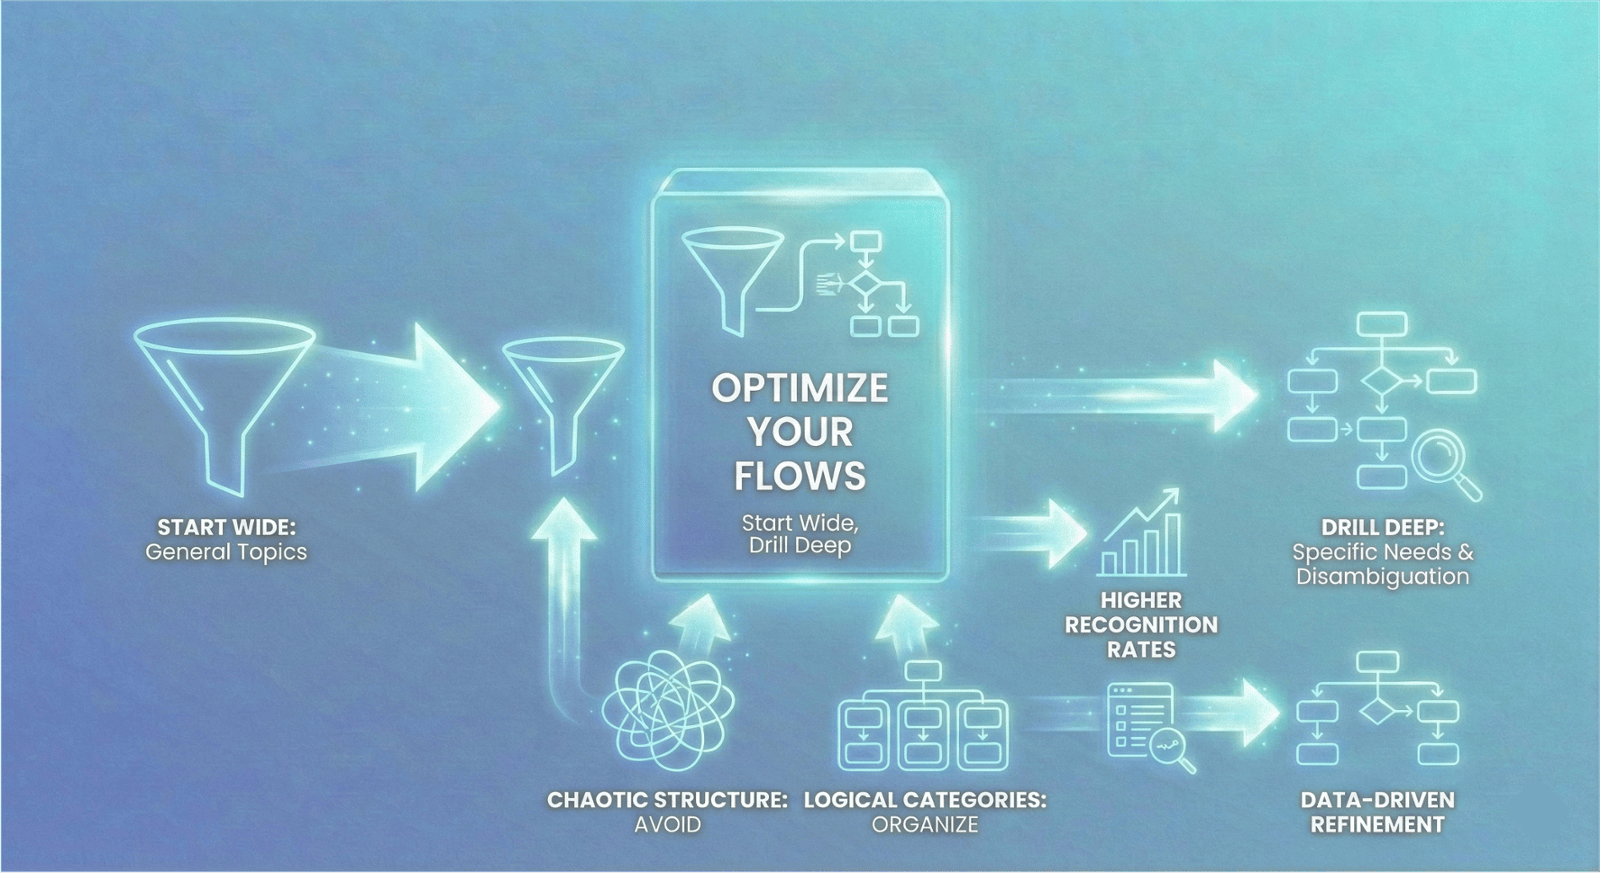
Step 8: Optimize your Flows
Design your conversation like a funnel: Start wide, drill deep.
When configuring intents in Chatlayer, avoid hyper-specificity at the start. Instead, map your initial intents to general topics to capture the user's interest broadly. Once the flow is triggered, use follow-up questions (disambiguation) to pinpoint exactly what the user needs.
This works because:
1. Higher Recognition Rates: Broad intents are easier for the NLP to catch.
2. Data-Driven Refinement: You can use conversation logs to break these general intents into specific ones later, once you have real user data.
Finally, maintain architectural hygiene. Group your flows into clear logical categories. If the structure looks chaotic to you in the builder, the conversation will feel chaotic to your user.
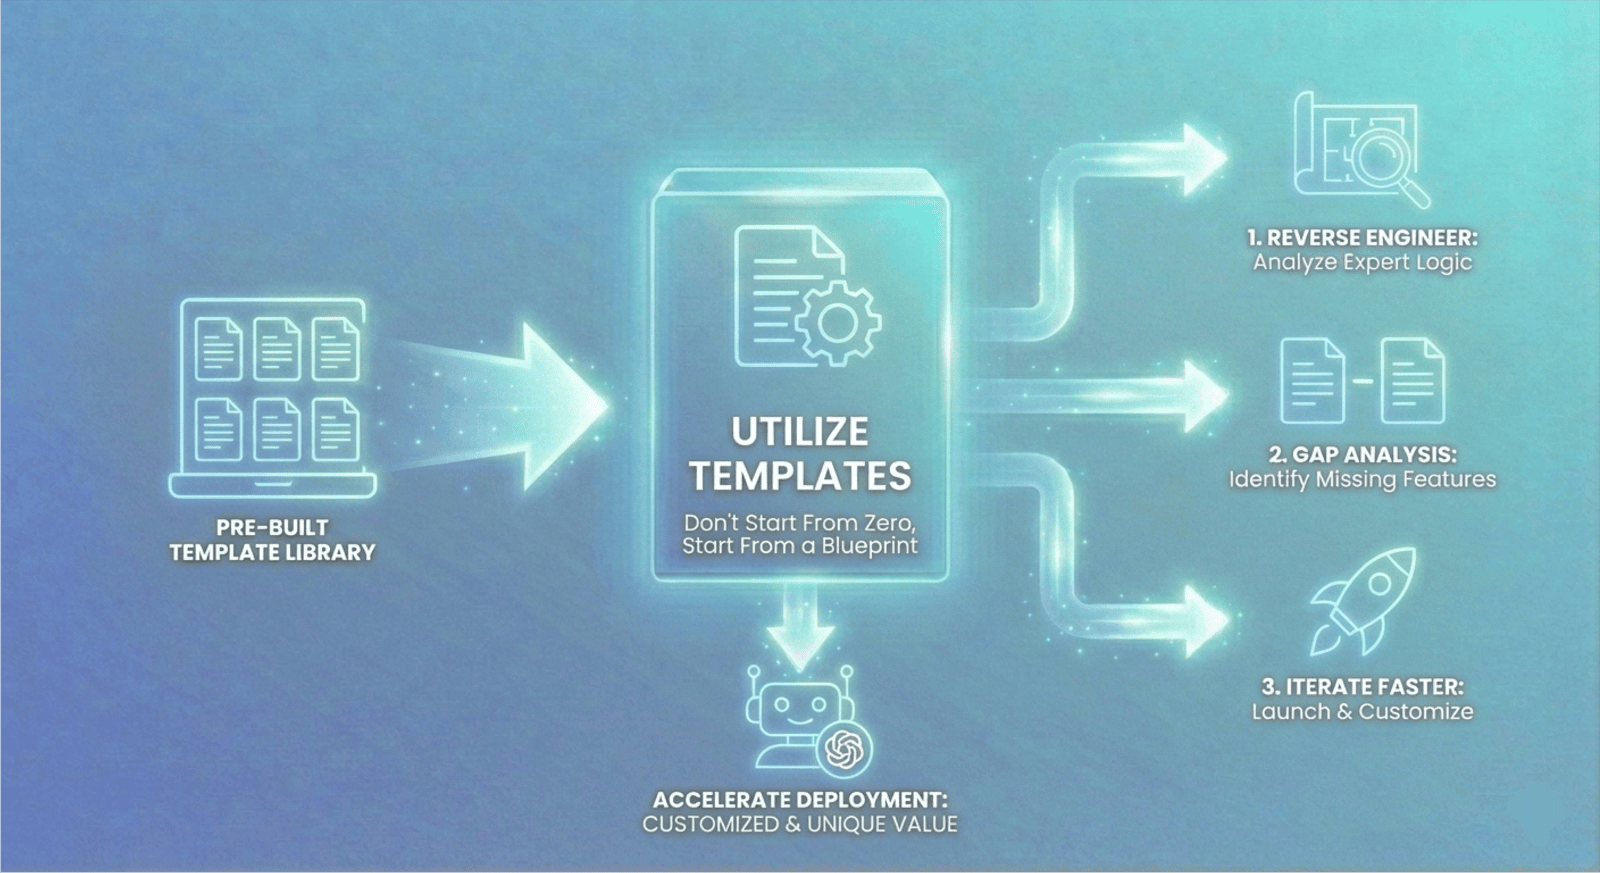
Step 9: Utilize Templates
Don’t start from zero when you can start from a blueprint!
Sinch Chatlayer offers a robust library of pre-built templates designed to solve common business challenges immediately. We recommend utilizing these not just as shortcuts, but as structural guides. Accelerate your deployment:
1. Reverse Engineer: Analyze the templates to see how expert conversational logic is structured.
2. Gap Analysis: Use the pre-built flows to identify what features you might have missed in your initial scoping.
3. Iterate Faster: Launching from a template allows you to move past your first "Publish" milestone quicker, freeing up time to focus on customization and unique brand value.
Efficient automation isn't about building everything yourself; it's about building on top of what already works.
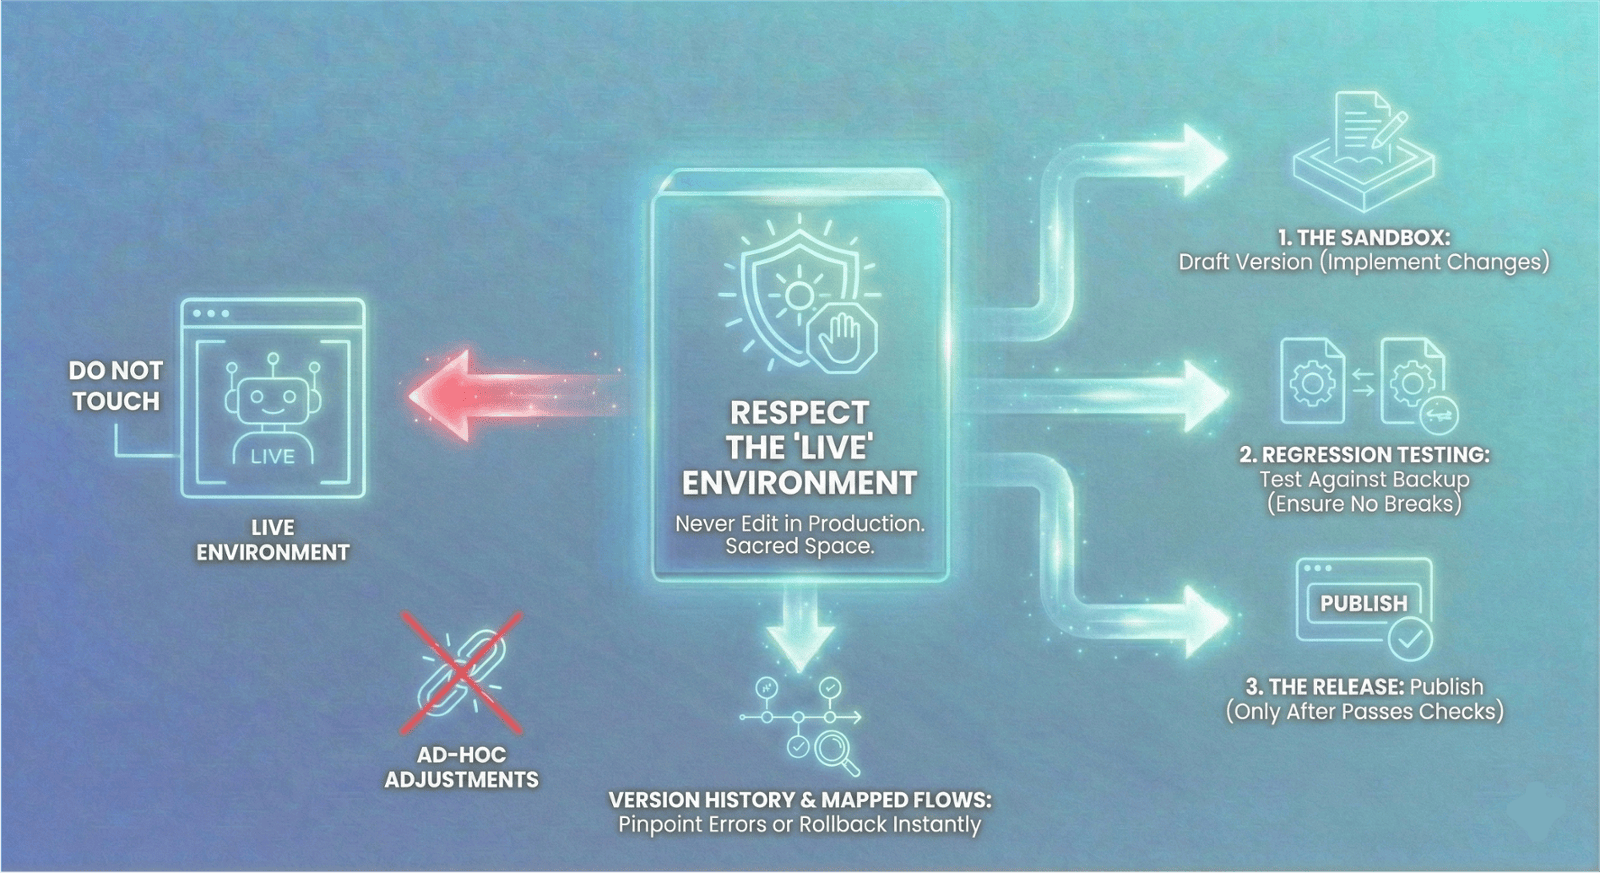
Step 10: Respect the "Live" Environment
We conclude our 10-part series with the most critical rule of long-term maintenance: Never edit in Production.
Once your bot is live, the "Live" environment is sacred. Making ad-hoc adjustments to a live bot is a recipe for disaster, potentially breaking user journeys in real-time. Instead, adopt a strict deployment pipeline:
1. The Sandbox: Implement all changes in your DRAFT version first.
2. Regression Testing: rigorously test these changes against your backup versions to ensure new logic doesn't break existing flows.
3. The Release: Only once the draft passes all checks should you hit "Publish."
By maintaining clear version history and keeping your updated flows mapped out, you ensure that if an error does occur, you can pinpoint the root cause—or roll back to a previous version—instantly.